These notes are to assist in users attempting to improve their printer’s usefulness, but every situation may be different, and caution is suggested in attempting any repairs yourself. And after any steps or all are taken, you may still need to return your device to a service centre for repair or replacement. We accept no responsibility for printer failures or printer damage caused by misunderstanding this information or irreparable devices.
First Step: Identify the type of printer
Is it Inkjet or Laser?
Laser’s uses powder so none of the below suggestions are for you sorry
Is the printhead incorporated in the ink cartridge?
- Yes, keep reading
- No Jump to Step 1A
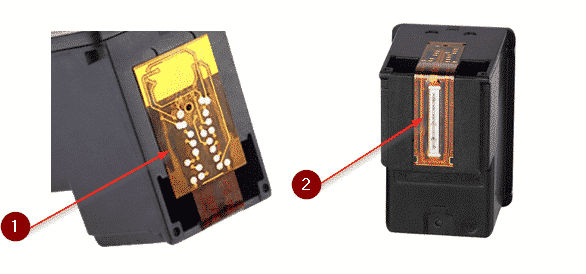
(1)Circuit (2)Print Head
This is an example of on a print head included cartridge the circuit is more elaborate
Step A
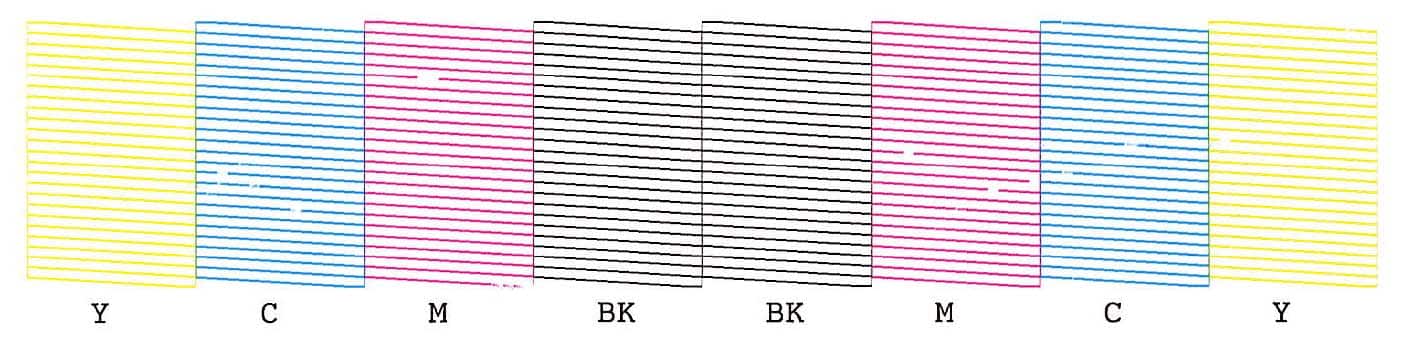
Perform a print nozzle check, if your printer does not support a nozzle check email us for a print test page.

In this example the black printing is poor, run through a single clean head cycle (this is usually found under printer properties and then maintenance, or on the inbuilt printer menu (only on certain devices) Reprint the nozzle check, and if there is no improvement move to step B
Step B
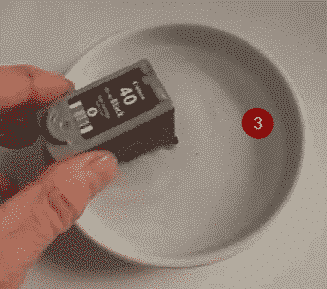
If the print head is blocked identify the offending cartridge, (please note this is only for print head incorporated cartridges), doing this to a cartridge that hasn’t got an inbuilt print head, will dilute the ink, and render the cartridge useless. Soak it for a while for 10 – 30 minutes in distilled water (as tap water has impurities that can promote corrosion). Once this is completed Gently dab the print head on a low lint paper towel, not a tissue. Make sure that the cartridge is fully dried, and no moisture is present residual from the soaking before returning it back to the cradle inside the printer (otherwise this could permanently damage your printer).
Rerun the Nozzle check and if the nozzles still appear to be blocked repeat the above process, but if this fails then purchasing a new cartridge may be your only solution to rectify this problem as it may simply have the ink evaporated or the ink cartridge print head has failed.
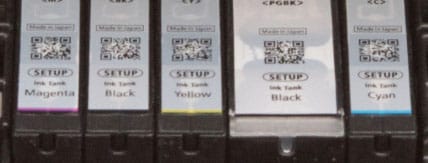
This is an example of an ink tank model (the printhead is a separate component to the cartridge)
![]() These models usually have a chip like the above illustration, this chip will act like a fuse and once blown does not allow the printer to continue operation until the cartridge or chip is replaced.
These models usually have a chip like the above illustration, this chip will act like a fuse and once blown does not allow the printer to continue operation until the cartridge or chip is replaced.
 The new very popular continuous ink printers also have a separate printhead to the ink storage component.
Step 1A
Perform a print nozzle check, if your printer does not support a nozzle check email us for a print test page.
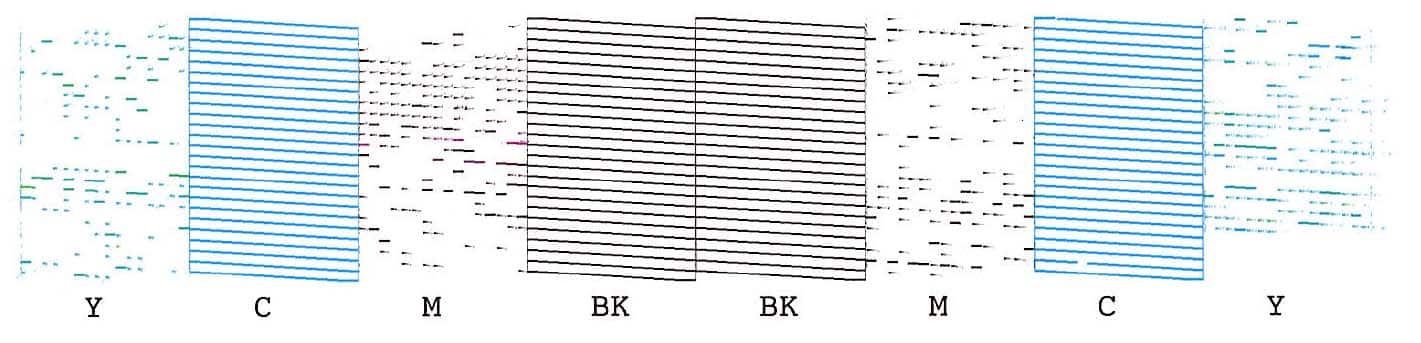
This is an example of a print that we recently had print quality issues with.

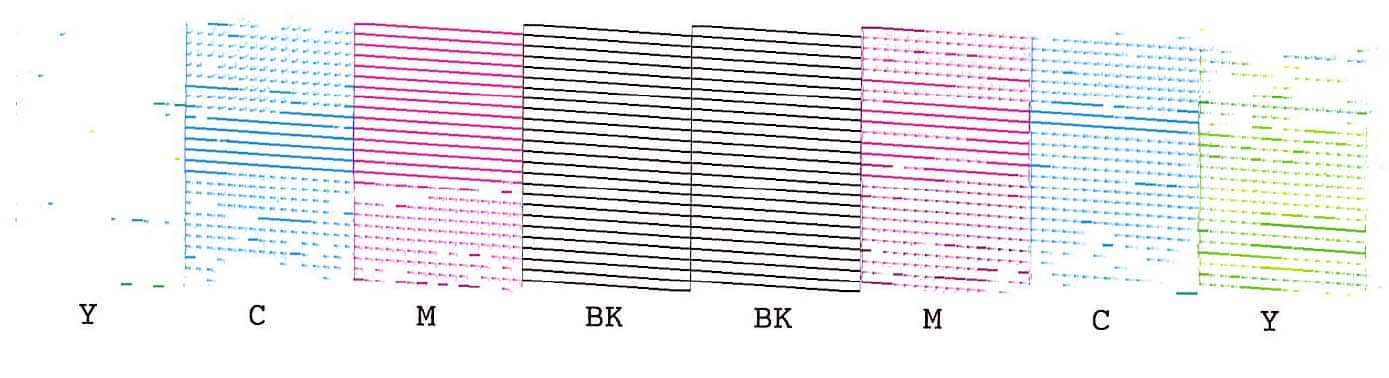
After one print head clean, try not to perform more than three head cleans in a row. If you’re up to three and no major progress give it a rest and repeat the process tomorrow.
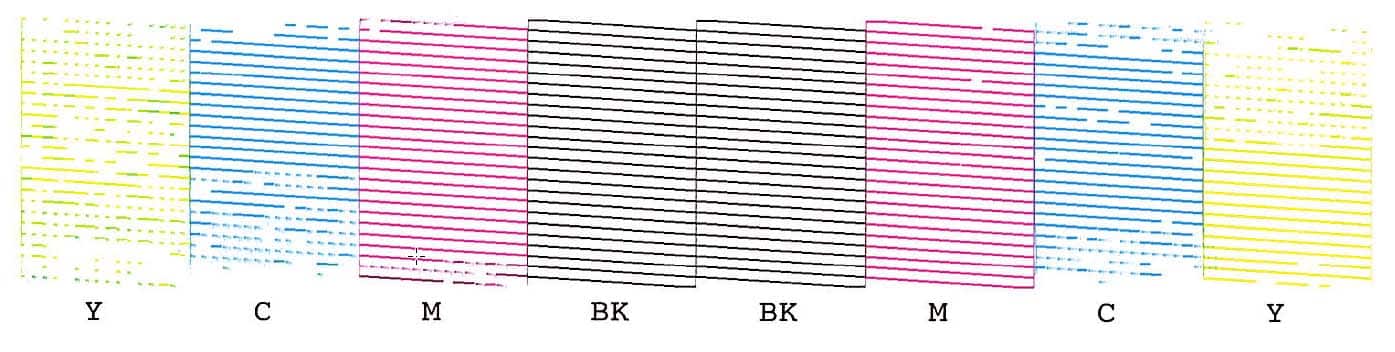
This final print is after 20 head cleans, but we have managed to dislodge almost all the blockages. In my opinion, this printer can now be returned to normal usage and with regular use, it is my belief that most times the printer will be usable from this point on. However, if you print a photo, you may find that there is a noticeable print quality loss.
Another thing that you can try is to change the printers’ settings within your printer driver to “Best Photo” or “Optimal” what this does generally is that the print head will pass over the same line twice increasing the chance of any residual lumps within the print head to be dislodged and then you will see a noticeable improvement. (The reason why we suggest this is multiple head cleans cause the printer’s waste ink pads to become saturated and this may exacerbate the print blocking issue)
Failing the steps above then you may need to replace the print head unit, some manufacturers do offer these so definitely check the availability out before disposing of the printer
Extra Notes
Printer firmware updates do fix some issues, but they may also reduce your ability to use aftermarket cartridges.
If your want to produce top quality photos, you really can’t go past using genuine cartridges as they are the only way to maximize print colour matching and give you the best opportunity to do this as although aftermarket manufacturers strive to give you the closest alternative to genuine ink, they cannot copy it exactly.
Alternating between Aftermarket and Genuine cartridges may lengthen your printer’s life as some manufacturers add a detergent component to their inks and this assists with maintaining a healthy print function.
We fully agree with environmentally sustainable practices and encourage you to recycle your paper and cartridges. When doing multiple nozzle checks definitely turn the paper upside down and around the opposite way as then you will be able to fit up to four nozzle checks on one page.
Have you taken a photo that you are super proud of or makes you smile, then why not print it off and give it as a gift to a loved one as a gift? As tactile things may create greater joy than something digitally shared!